Week 8 [Mon, Mar 6th] - Programming Topics
Guidance for the item(s) below:
So far, we have been using simple objects provided by Python (e.g., str, int, bool) and putting them into lists, dictionaries (which are objects themselves), and combinations of the two (e.g., a list of dictionaries) to arrange our data.
It is now time to learn how to define our own classes so that we can create objects that match our needs e.g., to use Task objects to represent a task in Monty, instead of using a list such as ["read book", True].
Before reading the section below which explains how to write Python classes, read the SE topic OOP: Basics get a general idea about classes.
Object-Oriented Programming
Classes
You can define your own classes (i.e., object types) in Python, which can then be used alongside the built-in classes such as list, int, str, etc.
The syntax for defining a class:
class ClassName:
  # <statement-1>
  .
  .
  .
  # <statement-N>
It is customary to use Upper Camel Case for class names.
The syntax for creating (also called instantiating) an object of the class is ClassName().
The code below defines a class named Employee, creates two employee objects, and prints the class/type of each object.
class Employee:
  pass # an empty class

john = Employee() # create an Employee object
print(type(john)) # print type of the john object
alice = Employee()
print(type(alice))
Note how the type of each object is given as <class 'Employee'> i.e., a class with name Employee.
<class 'Employee'>
<class 'Employee'>
You can add methods to the class by defining them inside the class definition. Note that a method of a class always take self as the first parameter. self refers to the object itself. When calling the method, there is no need to supply an argument for the self parameter as the target object is implicitly taken as the argument for that parameter.
Consider the code below:
| → | |
write(self, text) method is called as p.write('It was a dark night ...').
This is how the arguments are matched with the parameters:
self→ptext→'It was a dark night ...'
You can specify how to initialize an object of a class by defining an __init__() method in the class. Here are the important things to note about the __init__() method:
- There are two underscores in front and two behind the word
init.
_init_(self)
__init__(self) - It will be called every time you create an instance of the class.
- If it has parameters, you need to provide arguments for those parameters when you instantiate an object of that class.
This example shows an __init__ method added to a Person class.
| → | |
An object can have attributes i.e., values attached to the object, just as an object can have methods. Attributes and methods of an object can be accessed using the objectname. syntax, as you did with objects of built-in classes.
This example shows accessing the get_age() method and the birthday attribute of an object x.
| → | |
The code within a class needs to use the self. to refer to its own attributes and methods. Furthermore, the best place to initialize attributes is the __init__() method.
Note how the __init__() method of the Book class initializes its two attributes and calls another of its own methods i.e., self.describe().
class Book:

  def __init__(self, book_title, book_author):
    self.title = book_title # initialize attribute title
    self.author = book_author # initialize attribute author
    self.describe() # call another method of the class

  def describe(self):
    # print attributes of the object
    print('Book info:', self.title, '/by', self.author)

book1 = Book('The Jungle Book', 'Leo Tolstoy')
book2 = Book('The Art of War', 'Sun Tzu')

print()  # print a blank line
print('Title:', book1.title)
print('Author:', book1.author)
book1.describe()
Book info: The Jungle Book /by Leo Tolstoy
Book info: The Art of War /by Sun Tzu

Title: The Jungle Book
Author: Leo Tolstoy
Book info: The Jungle Book /by Leo Tolstoy
You can get your classes to work with each other.
In this example we define a ReadingList class that can store a list of Book objects.
class ReadingList:

  def __init__(self, initial_list):
    self.books = initial_list

  def add_book(self, book):
    self.books.append(book)

  def show_authors(self):
    for b in self.books:
      print(b.author)

my_list = ReadingList([book1]) # book1 defined in a previous example
my_list.add_book(book2) # book2 defined in a previous example
my_list.show_authors()
Leo Tolstoy
Sun Tzu
Guidance for the item(s) below:
Next, let's learn how to install and use third-party libraries so that you can use even more functionality than those Python provides by default.
Appendix A: Installing 3rd-Party Modules
In addition to built-in modules you get with Python by default, there are many modules written by others that you can make use of. You can install third-party modules using Python’s pip tool. This tool downloads and installs Python modules onto your computer from https://pypi.python.org/ (aka PyPi or Python Package Index).
First, ensure that you have pip installed by running this command in a command shell (not Python interpreter shell), which should print out the version of the pip tool you have.
pip --version
After that, to install a third-party module (or packages as they are sometimes called), you can run the pip install {packagename} command.
The example below shows how to install the colorama module that allows you to colorize text printed out to the console.
pip install colorama
Collecting colorama
  Downloading colorama-0.3.9-py2.py3-none-any.whl
Installing collected packages: colorama
Successfully installed colorama-0.3.9
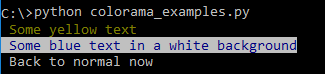
After installing colorama, you can import it into your code and use its features to print colorized text.
import colorama

colorama.init()  # one-time initialization

print(colorama.Fore.YELLOW + ' Some yellow text')
print(colorama.Fore.BLUE + colorama.Back.WHITE + ' Some blue text in a white background')
print(colorama.Style.RESET_ALL + ' Back to normal now')
Some useful third-party modules:
colorama: For colorizing text printed in the consoleselenium: For automating the Browserpyzmail: For sending emailstwilio: For sending SMSPyPDF2: For working with PDF filespyperclip: To access the clipboard of the operating systemdateparser: To parse natural language repsentation of dates e.g.,in 2 days,tomorrow
Resources: